Screen Recording (macOS 10.15+ Catalina)
App Version
Allow the App/Program Version of Teams or Webex to Screen Share (applies to macOS 10.15+ Catalina and Big Sur users)
This was introduced in macOS 10.15 (Catalina) and allows you to control the applications that can record the contents of your screen. If blocked, you will not be able to share your screen. (read more about this)
- On your Mac, choose Apple menu
- Open System Preferences
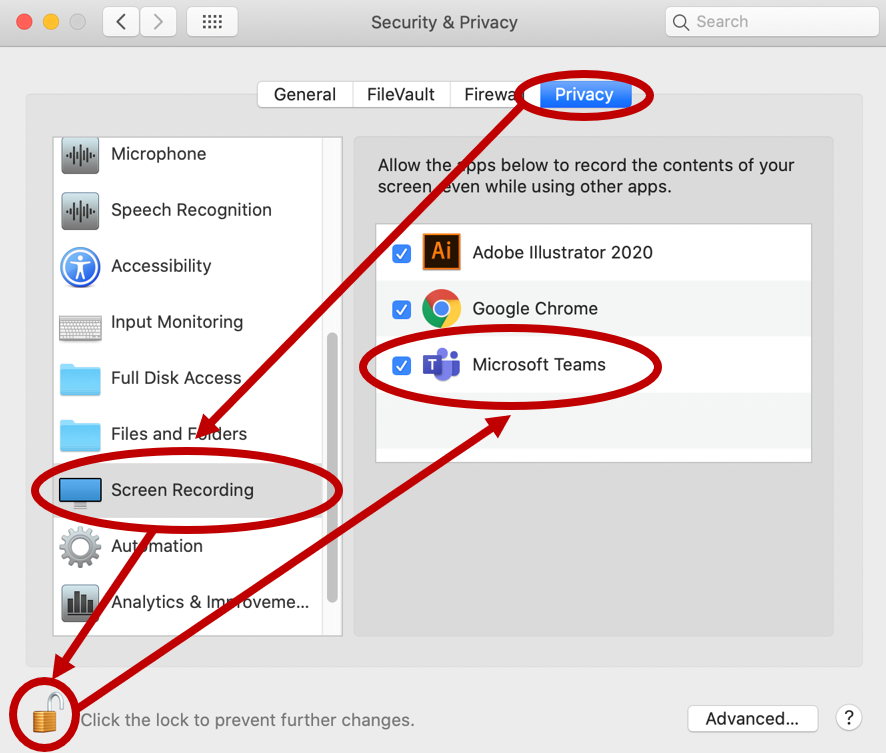
- Click Security and Privacy
- Choose the Privacy tab
- Click the Padlock 🔒 (bottom left) and enter your computer login credentials to unlock the settings.
- Under Screen Recording, make sure Teams and/or Webex is checked
Web-based Version
Allow the Browser Version of Teams or Webex to Screen Share (applies to macOS 10.15+ Catalina and Big Sur users)
When joining meetings over Chrome, you may have been prompted to allow access. If you missed the initial Teams notification requesting access, you can:
- On your Mac, choose Apple menu
- Open System Preferences
- Click Security and Privacy
- Choose the Privacy tab
- Select
- Click the Padlock 🔒 (bottom left) and enter your computer login credentials to unlock the settings.
- If you see Google Chrome unchecked, check it so Teams and Webex can access your camera.
- Select the Microphone option and do the same. Make sure Google Chrome is checked to let Teams and Webex access your microphone.
- For macOS 10.15+ (Catalina and Big Sur) users, select the Screen Recording option and do the same. Make sure Google Chrome is checked so that you can share your screen in Teams and Webex.
- Start or rejoin your meeting and other participants will be all set.
Note: If you are still having issues enabling your camera or microphone, check your web browser security settings. You will need to give Teams and Webex access to these devices by clicking on the lock 🔒 icon that appears before your meeting link at the top of your web browser.